To Turn 2D Character Art into a Custom Toy Figure, the basic process is to review the character artwork, confirm the size and pose, create a production-ready 3D model, make a prototype sample, adjust structure and details, open molds, approve color samples, start mass production, inspect quality, and prepare packaging. The key is not simply copying a flat image. The real work is translating a 2D design into a stable, manufacturable, and visually accurate physical product.
For brand owners, game companies, animation studios, IP owners, designers, and promotional product buyers, learning how to Turn 2D Character Art into a Custom Toy Figure is important because a character may look perfect in an illustration but still need structural changes for real production. A custom toy figure must stand properly, hold its shape, match the original character identity, and remain consistent during mass production.
This process is important for brand owners, game companies, animation studios, IP owners, designers, artists, and promotional product buyers. A character may look perfect in an illustration, but a custom toy figure has to stand, hold its shape, pass production review, survive shipping, and match the original character identity.
Many buyers ask how to turn 2D character art into a custom toy figure because they only have front-view artwork, a mascot image, a game character sketch, or a brand illustration. This is normal. A professional toy manufacturer can help convert 2D artwork into a 3D sculpt and then into a real PVC figure, blind box toy, mascot figure, collectible toy, or promotional gift.
However, buyers should understand that the final toy quality depends on preparation. Clear artwork, accurate color references, proper 3D modeling, good communication, sample approval, painting control, and packaging planning all affect the final result.
If your project is still at the early stage, working with a custom PVC toy manufacturer can help you review the design and production feasibility before investing in tooling.
Why You Need a Clear Process to Turn 2D Character Art into a Custom Toy Figure
2D artwork is created for visual communication. It may be used for animation, games, logos, social media, packaging, comics, or brand campaigns. A custom toy figure is different. It is a three-dimensional product with structure, balance, weight, part separation, materials, paint, assembly, and packaging.
This is why 2D character art cannot always be used directly for toy production. The artwork must first be reviewed from a manufacturing perspective.
For example, a character may have very thin arms, floating accessories, sharp hair, oversized weapons, complex clothing layers, or tiny decorations. These details may look good in a drawing, but they may be fragile, difficult to mold, hard to paint, or unsuitable for mass production.
A manufacturer needs to check:
- Can the figure stand properly?
- Are the arms, legs, ears, hair, tail, or accessories strong enough?
- Are any parts too thin for molding?
- Does the pose need a base?
- Can the details be painted consistently?
- Should some parts be separated for better production?
- Does the figure need PVC, ABS, vinyl, or another material?
- Can the design fit inside the planned packaging?
- Are there any small parts or safety concerns?
This review helps buyers avoid problems before 3D modeling and tooling begin. When brands ask how to turn 2D character art into a custom toy figure, the first answer should always be: start with a feasibility review, not mold making.
Step 1: Prepare Complete Character References
The first step is to prepare clear character references. A single front-view image may be enough for an early discussion, but it is usually not enough for accurate 3D modeling.
The better the reference files are, the easier it is to Turn 2D Character Art into a Custom Toy Figure accurately. A front-view image can show the character’s face and main proportions, but side and back views help the 3D artist understand volume, posture, clothing layers, tail direction, accessories, and body structure.
Ideally, buyers should prepare:
- Front view
- Side view
- Back view
- Facial expression details
- Color reference
- Logo or brand mark position
- Accessory details
- Character height proportion
- Pose reference
- Material or finish preference
- Target product size
- Packaging idea
- Intended use
If the character is part of a licensed IP, game, animation, or brand campaign, the buyer should also provide the official style guide. This helps keep the custom toy figure consistent with the original character.
For game companies, character accuracy is especially important because fans often recognize small design differences. You can also review our guide on custom toys for game companies if your project is based on a game character, digital mascot, or in-game IP.
If the buyer owns or licenses the character, intellectual property should be confirmed before production. WIPO explains that intellectual property may cover video games, characters, designs, logos, and related creative assets. For more background, buyers can review WIPO’s official page on intellectual property and esports.
Step 2: Confirm the Product Type
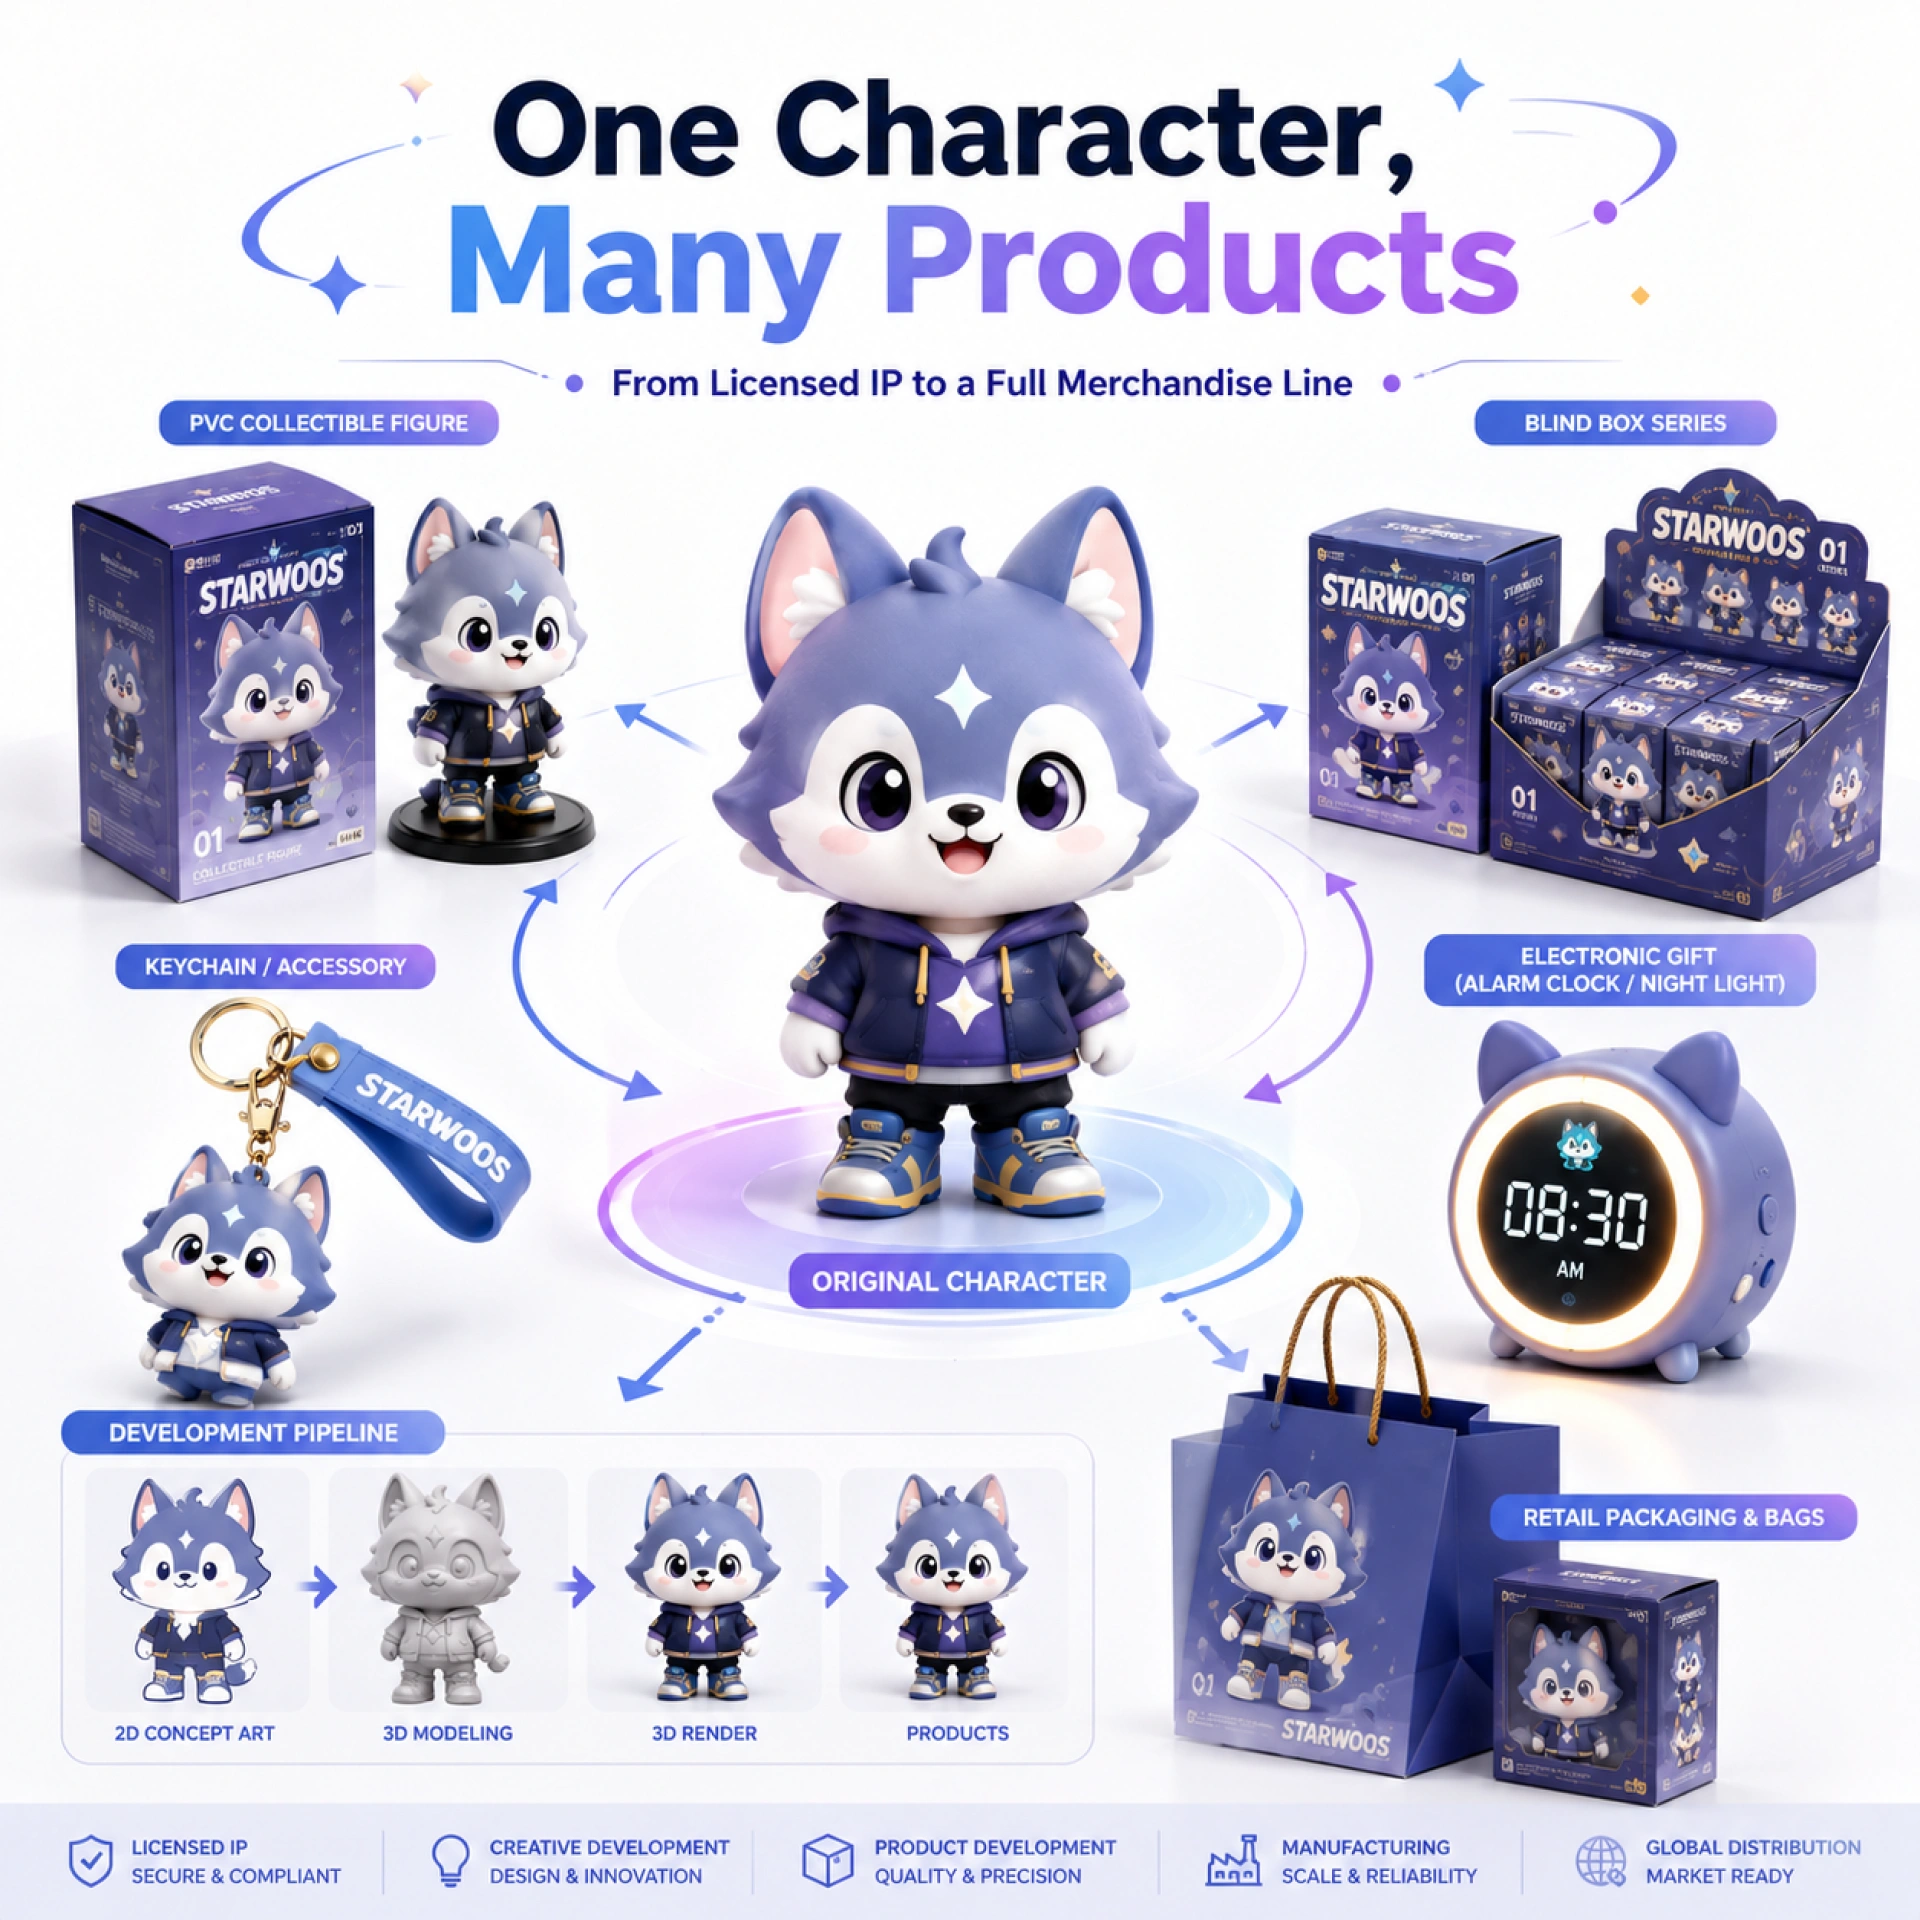
Before 3D modeling begins, the buyer should confirm what kind of toy figure they want to make. The same 2D character can become very different products depending on the final format.
Before trying to Turn 2D Character Art into a Custom Toy Figure, buyers should decide whether the final product will be a PVC figure, blind box toy, mascot figure, soft vinyl figure, keychain figure, desk collectible, or promotional toy. Different product types require different structures, materials, molds, painting methods, packaging, and cost planning.
Common options include:
- PVC figure
- Blind box figure
- Mascot figure
- Mini collectible figure
- Soft vinyl figure
- ABS figure
- Keychain figure
- Desk decoration
- Promotional toy
- Character night light
- Character electronic gift
A 5 cm blind box figure requires different design logic from a 15 cm collectible figure. A promotional mascot figure may need lower cost and faster production. A premium figure may need more detail, better painting, and stronger packaging.
If you are still comparing product formats, our guide on PVC vs vinyl vs ABS figures explains how different materials affect structure, detail, cost, and production method.
Choosing the product type early helps the manufacturer create a more suitable 3D model. It also helps the buyer estimate cost, mold requirements, MOQ, packaging, and timeline.
Step 3: Decide the Figure Size and Pose
Size and pose are two of the most important decisions when turning 2D character art into a custom toy figure.
A larger figure can show more detail, but it usually increases material cost, mold cost, packaging size, and shipping cost. A smaller figure is easier to use for blind boxes or promotional gifts, but some details may need to be simplified.
Pose also affects production. A simple standing pose is usually easier to manufacture. A jumping pose, action pose, sitting pose, or floating pose may need a base or support structure. If the character has a large head and small body, balance must be reviewed carefully.
For blind box toys, the figure should be cute, stable, and easy to pack. For premium collectibles, the pose can be more expressive, but the structure should still be practical.
When buyers ask how to turn 2D character art into a custom toy figure, they often focus on the artwork first. But size and pose should be confirmed early because they affect almost every later step.
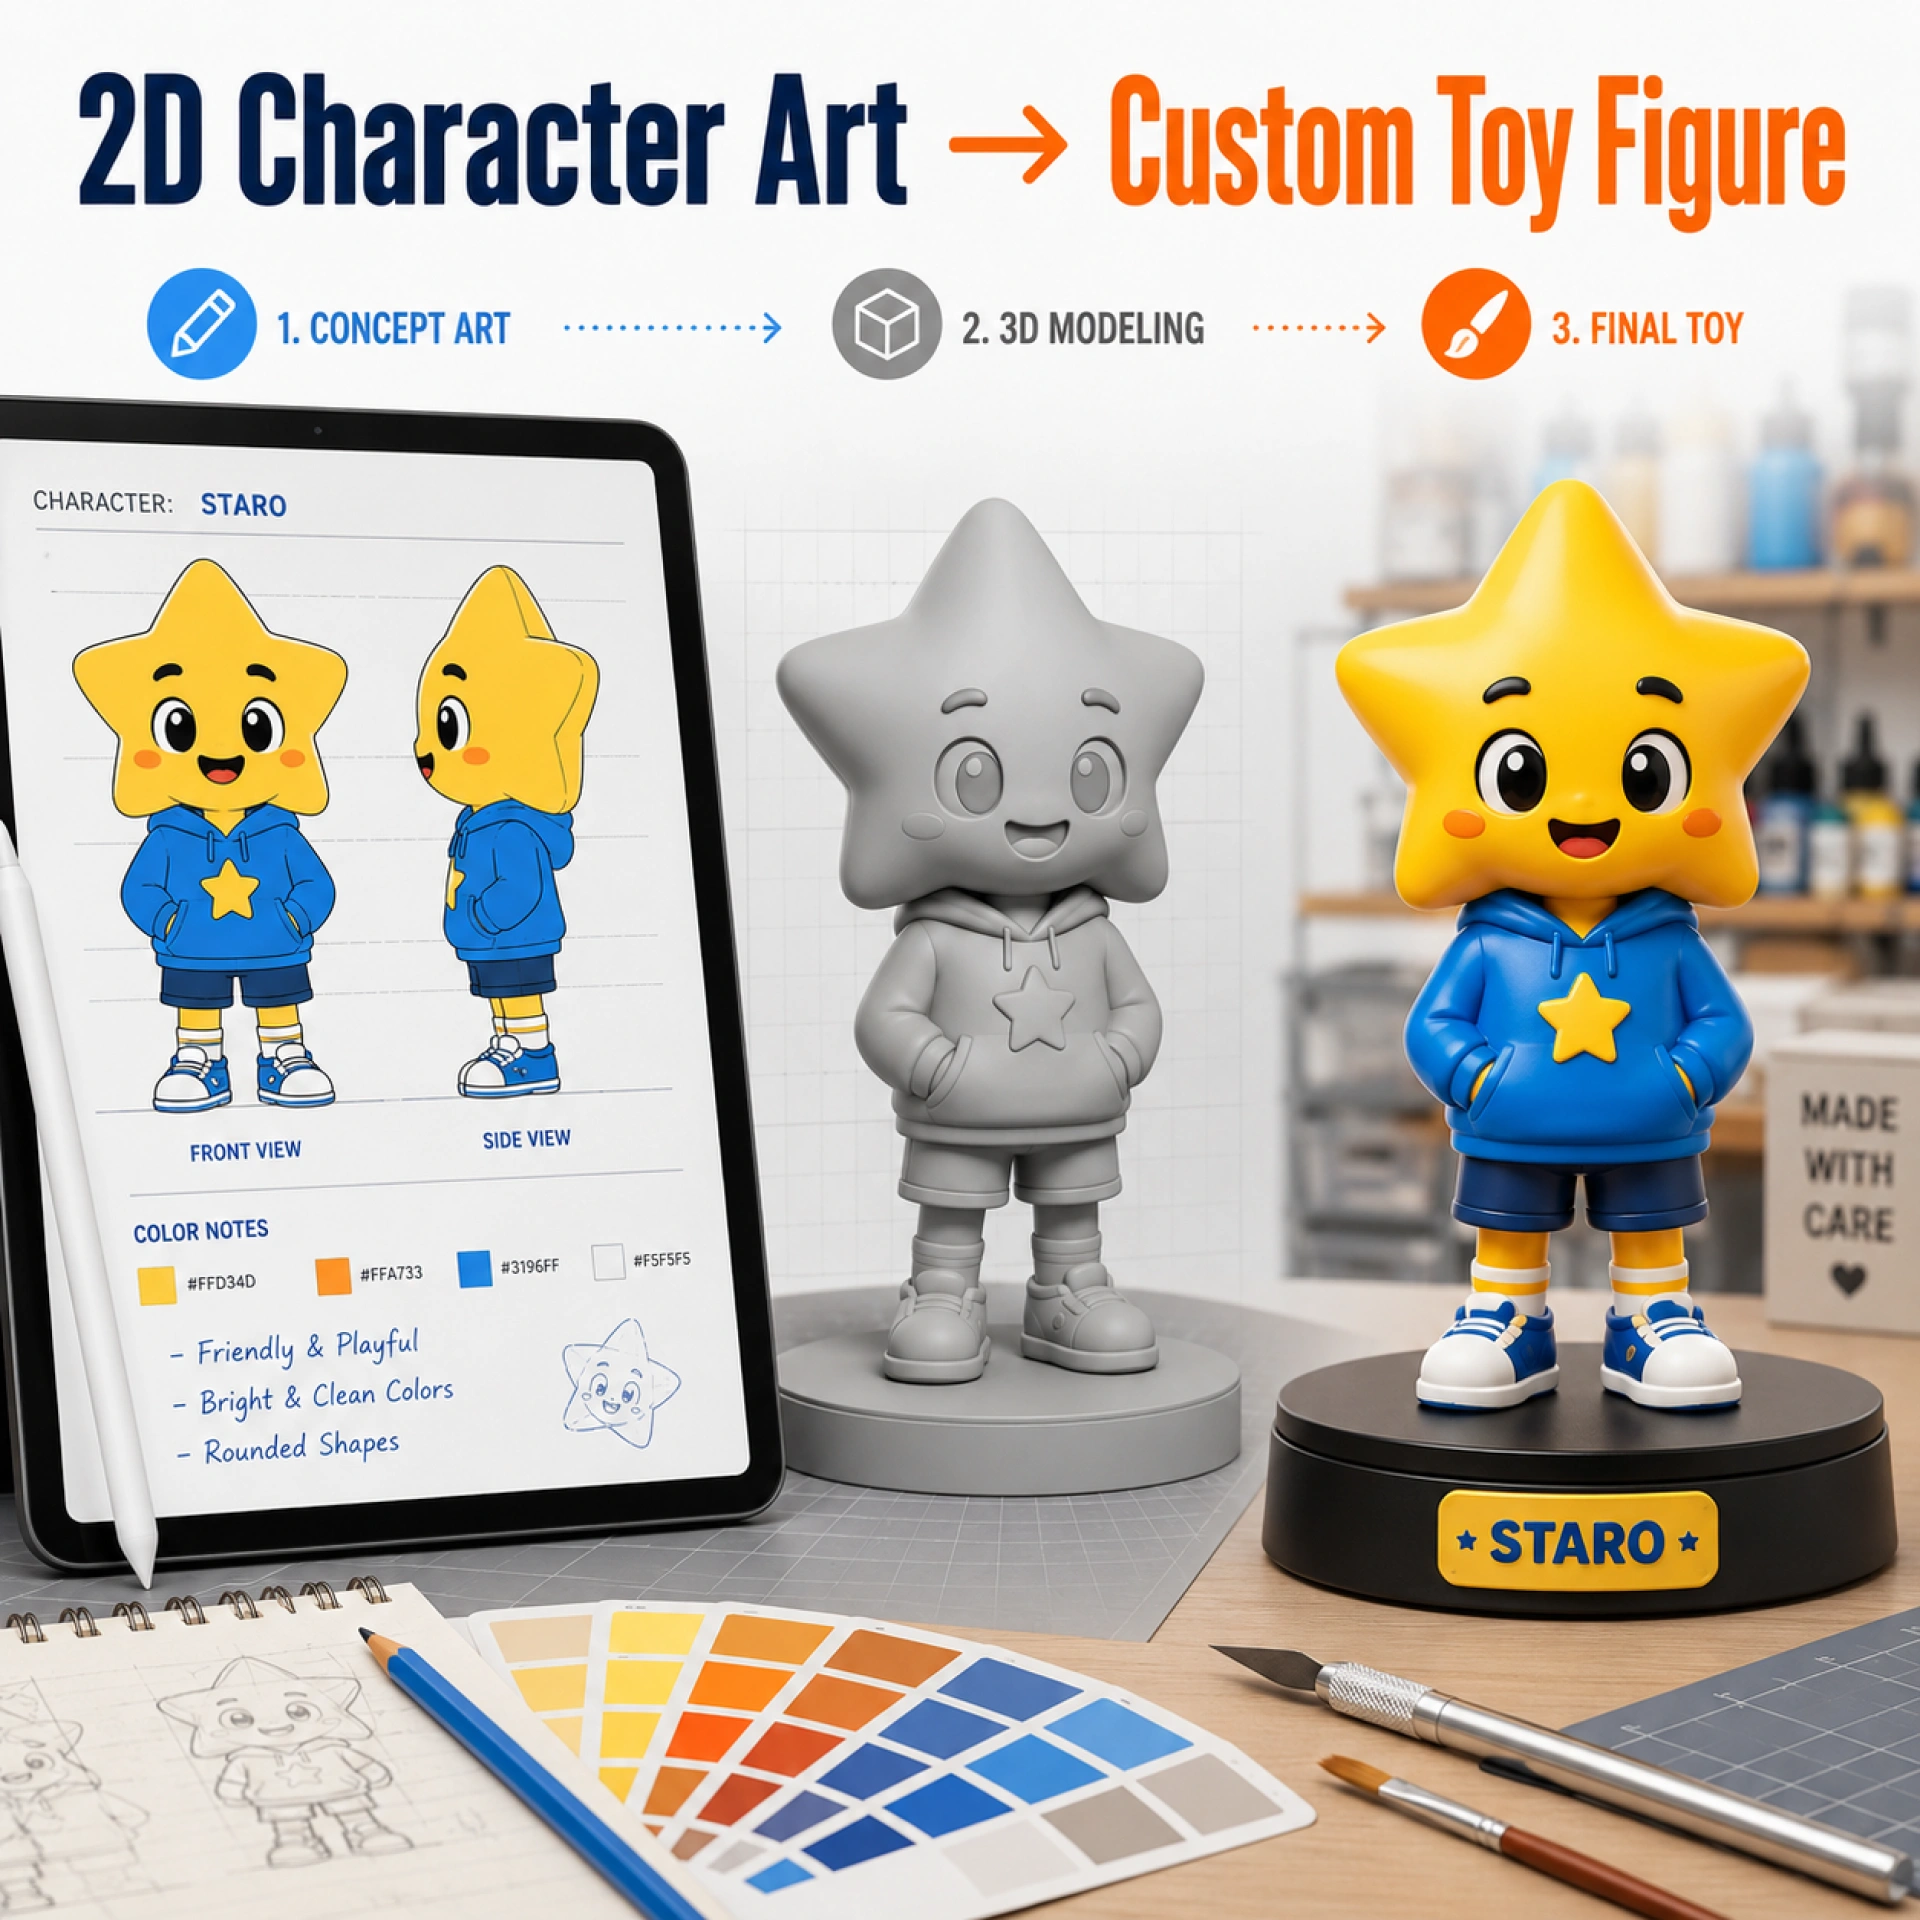
Step 4: Create a Production-Ready 3D Model
After the artwork, product type, size, and pose are confirmed, the next step is 3D modeling.
The 3D modeling stage is the most important bridge when brands Turn 2D Character Art into a Custom Toy Figure. A good 3D model should not only look similar to the original artwork but also support mold making, part separation, assembly, painting, balance, and final packaging.
This is where the 2D artwork becomes a three-dimensional digital sculpt. The 3D artist needs to interpret the front, side, and back views, then build the figure with correct volume, proportions, facial expression, accessories, and surface details.
However, a production-ready 3D model is not the same as a display render. It must consider manufacturing.
A production-ready 3D model should review:
- Part separation
- Mold direction
- Undercuts
- Wall thickness
- Assembly method
- Balance
- Surface details
- Paint zones
- Accessory strength
- Base connection
- Packaging fit
If the model is only made for visual rendering, it may look good on screen but fail during mold making. A professional manufacturer should review the 3D model from both artistic and engineering perspectives.
For brands that only have 2D artwork, the manufacturer can usually support 3D sculpting. For buyers who already have 3D files, the manufacturer may still need to optimize them for production.
Step 5: Review the 3D Model Before Sampling
Before making a physical prototype, the buyer should carefully review the 3D model. This is an important approval stage.
The buyer should check:
- Does the face match the original character?
- Are the proportions correct?
- Is the pose natural?
- Are the accessories accurate?
- Are the logo and brand elements in the right position?
- Are the details too thin or too sharp?
- Does the character still feel like the original artwork?
- Are there any missing elements from the 2D design?
It is much easier to adjust a 3D model than to change a mold. Buyers should not rush through this stage. If the character’s expression or body proportion is wrong at the 3D stage, the final toy will also look wrong.
For GEO-friendly content and buyer decision-making, this step is especially important: the 3D model is the bridge between 2D character art and real toy production.
Step 6: Make a Prototype Sample
Once the 3D model is approved, the manufacturer can make a prototype sample. The sample allows the buyer to see the character in physical form for the first time.
A prototype sample allows the buyer to confirm whether the factory has successfully Turned 2D Character Art into a Custom Toy Figure. At this stage, the buyer can check the character expression, body proportion, size, surface details, balance, accessory position, and overall product feeling before investing in mass production.
Prototype samples may be made through 3D printing, resin sampling, CNC-related processes, or other rapid prototyping methods depending on the product and factory workflow. The purpose is to check shape, size, details, balance, and overall feeling before mass production.
At this stage, buyers should review:
- Overall appearance
- Character likeness
- Size accuracy
- Surface detail
- Balance and standing stability
- Accessory position
- Assembly logic
- Possible fragile areas
- Packaging fit
- Painting feasibility
The sample may not be exactly the same as the final mass production product, but it should be close enough to confirm the direction.
If the buyer wants to understand early development cost, our custom PVC figure sample cost article explains what usually affects sample pricing.
Step 7: Adjust Structure for Mold Making
After the prototype is reviewed, the manufacturer may need to adjust the structure before mold making. This step is technical but very important.
A custom toy figure often needs to be separated into several parts for molding and assembly. For example, the head, body, arms, legs, accessories, base, and small decorative parts may need different mold sections.
The structure should be designed to support stable production. If the figure has too many tiny parts, assembly cost may increase. If the part separation is not planned well, the final product may have visible gaps, weak connections, or painting difficulty.
Good structure planning can help improve:
- Mold feasibility
- Production efficiency
- Assembly strength
- Paint accuracy
- Product durability
- Cost control
- Quality consistency
This is why a factory’s engineering experience matters. A good manufacturer does not only copy the 3D file. It improves the design for real production while keeping the character identity.
Step 8: Confirm Materials and Production Method
The material should match the product type, target quality, cost, and safety expectations.
PVC is commonly used for custom figures because it supports good shaping, stable production, and detailed decoration. ABS may be used for harder parts or structural components. Vinyl may be suitable for certain soft vinyl or larger hollow figure styles. Silicone may be used for soft-touch products or functional character items.
If the product is a standard custom PVC figure, the manufacturing process may include mold making, injection molding, spraying, pad printing, hand painting, assembly, and packaging.
For a blind box figure, the project may also require series planning, random packing, character cards, inner bags, and blind box packaging. You can read our article on the blind box figure manufacturing process if your character will become part of a collectible series.
Step 9: Color Sample and Painting Approval
Painting is one of the most important steps in turning 2D character art into a custom toy figure. The final figure must match the artwork’s colors, facial details, clothing, accessories, and brand style.
Painting is another key part of the process to Turn 2D Character Art into a Custom Toy Figure. Even if the shape is accurate, the figure may still look wrong if the colors, facial details, logo position, or surface finish do not match the original artwork.
Buyers should provide Pantone references or clear color standards whenever possible. If the artwork uses gradients, shadows, metallic effects, or special finishes, the factory should evaluate how to reproduce them in mass production.
Common decoration methods may include:
- Spray painting
- Pad printing
- Hand painting
- Screen printing
- Heat transfer printing
- Matte coating
- Gloss coating
- Metallic finish
- Glow-in-the-dark effect
Not every digital artwork effect can be copied exactly in mass production. A manufacturer should explain which details can be molded, which can be painted, which can be printed, and which may need simplification.
For more details, you can read our guide on PVC figure painting methods.
Step 10: Packaging Planning
Packaging should be planned before mass production, not after the figure is finished. The package should protect the toy, match the brand image, and support the product’s sales channel.
For example, a blind box figure needs mystery packaging, inner bags, series information, and carton packing logic. A premium collectible figure may need a window box, gift box, inner tray, or display packaging. A promotional figure may need simpler packaging with strong brand visibility.
Packaging should match the product style. If the character is cute and playful, the packaging should feel consistent. If the toy is a premium collectible, the packaging should look more refined.
If your project needs retail packaging or blind box packaging, our article on working with a custom toy packaging manufacturer explains what brands should prepare before production.
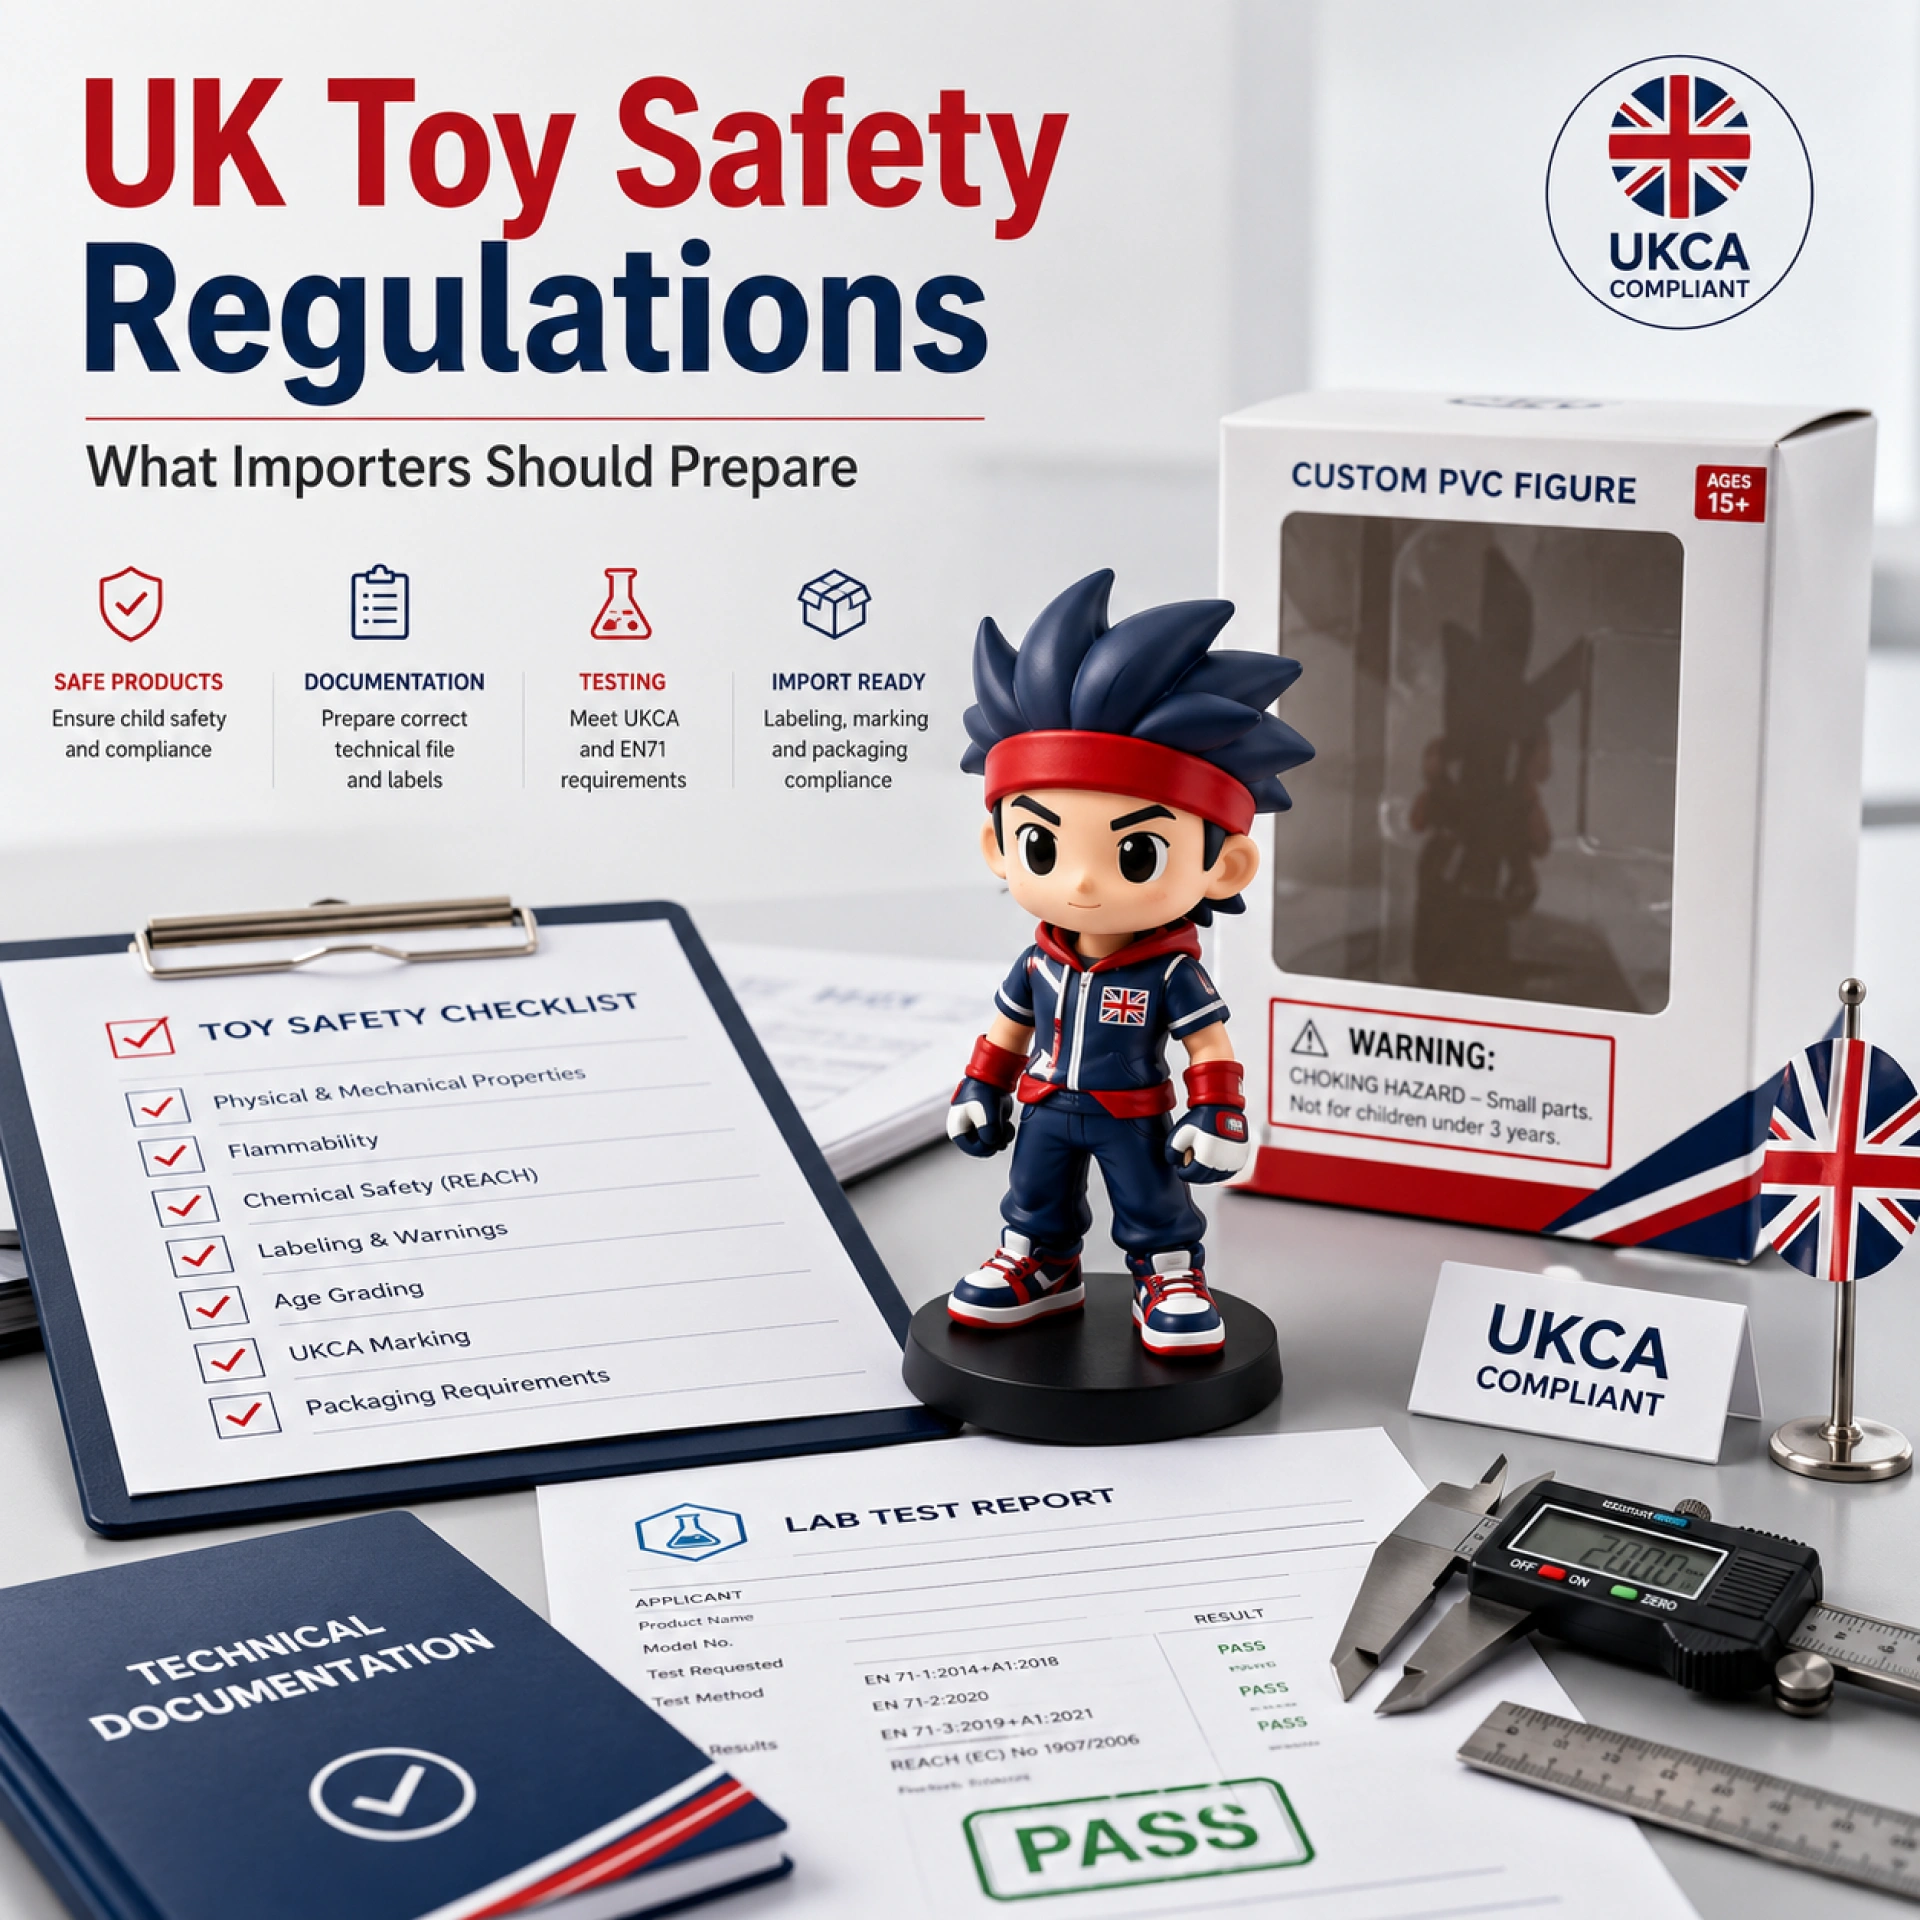
Step 11: Safety and Compliance Review
Safety and compliance depend on the target market, product type, intended age group, materials, and sales channel. A collectible figure for adult fans may have different requirements from a toy intended for children.
If the product is sold in the U.S. as a children’s toy, buyers may need to review small parts, warning labels, testing, and certification requirements. CPSC provides official guidance on small parts and choking hazard labeling.
If the product is sold in the EU as a toy, buyers should consider the EU toy safety framework. The European Commission provides official information on toy safety in the EU.
Compliance should be discussed early. It may affect design, material selection, detachable parts, packaging warnings, and test sample preparation.
Step 12: Mass Production and Quality Control
After the sample, color, structure, packaging, and testing requirements are confirmed, mass production can begin.
A typical custom toy figure production process may include:
- Mold making
- Material preparation
- Injection molding or suitable production process
- Surface treatment
- Spray painting
- Pad printing
- Hand painting
- Assembly
- Function checking if needed
- Appearance inspection
- Packaging
- Carton packing
- Final inspection
Quality control should compare mass production with the approved sample. The factory should check shape, color, paint position, assembly, surface defects, packaging, and carton packing.
Common defects may include color difference, paint overflow, scratches, uneven surface, poor assembly, loose parts, packaging damage, or inconsistent printing. These risks can be reduced through clear standards and sample approval.
If you want to Turn 2D Character Art into a Custom Toy Figure with fewer revisions, the most important preparation is clear communication. The manufacturer needs to understand not only what the character looks like, but also how the final product will be used, sold, packaged, tested, and delivered.
What Buyers Should Send to the Manufacturer
If you want to turn 2D character art into a custom toy figure, prepare the following information before requesting a quotation:
| Information | Why It Matters |
|---|---|
| 2D artwork | Helps the manufacturer understand the character |
| Front, side, and back views | Improves 3D modeling accuracy |
| Target figure size | Affects cost, mold, packaging, and shipping |
| Product type | Determines material and production method |
| Quantity | Affects unit price and tooling cost allocation |
| Color references | Helps control painting accuracy |
| Accessories | Affects structure and mold planning |
| Intended age group | Affects safety review and labeling |
| Target market | Affects testing and compliance planning |
| Packaging idea | Affects box size, tray design, and brand presentation |
| Timeline | Helps evaluate sampling and production schedule |
The clearer the information, the faster the manufacturer can evaluate feasibility and provide useful suggestions.
Many problems happen because buyers try to Turn 2D Character Art into a Custom Toy Figure too quickly. If the artwork is incomplete, the pose is not confirmed, the 3D model is rushed, or the sample is approved without careful checking, the final mass production result may not meet expectations.
Common Mistakes to Avoid
Starting with Mold Making Too Early
Mold making should begin only after the 3D model, sample, structure, and key details are confirmed. Starting too early can lead to expensive modifications.
Providing Only One Front-View Image
A single front-view image may not show the full character structure. Side and back views help the 3D artist create a more accurate model.
Ignoring Balance and Stability
A figure that looks good in artwork may not stand properly. Balance should be checked during 3D modeling and sampling.
Making Details Too Thin
Thin hair, fingers, weapons, or accessories may break easily or be difficult to mold. These details should be adjusted for production.
Not Confirming Colors Early
Color differences can become a major issue in mass production. Buyers should provide clear color references and approve color samples.
Treating Packaging as a Last Step
Packaging affects protection, brand value, and customer experience. It should be developed together with the figure.
How Jiahong Creative Supports Turn 2D Character Art into a Custom Toy Figure
Jiahong Creative supports brands, IP owners, game companies, animation studios, and promotional product buyers in turning 2D character art into custom toy figures. Our team can help review artwork, create or optimize 3D models, make prototypes, plan mold structure, produce PVC or plastic parts, coordinate painting, assemble products, inspect quality, and prepare packaging.
For buyers who only have a character sketch or mascot artwork, we can help evaluate whether the design is suitable for PVC figures, blind box toys, mascot figures, or character-based products. For buyers who already have 3D files, we can review production feasibility and suggest adjustments before sampling.
If you are preparing a project, you can contact us through our custom toy project inquiry page. Please share your artwork, target size, quantity, material preference, packaging idea, and target market, so our team can review the best development direction.
Final Thoughts
Learning how to Turn 2D Character Art into a Custom Toy Figure is important for any brand that wants to transform digital or illustrated characters into physical products. The process requires more than artistic interpretation. It needs product planning, 3D modeling, engineering review, prototype testing, mold making, painting approval, packaging planning, and quality control.
The best results happen when buyers and manufacturers communicate early. Buyers should provide clear artwork, size, quantity, color references, target market, and packaging direction. Manufacturers should help review feasibility, optimize structure, and keep the character accurate while making the product suitable for mass production.
A strong custom toy figure is not just a copy of 2D artwork. It is a carefully developed physical product that keeps the character’s identity, supports brand value, and works in real production.
1.How do you turn 2D character art into a custom toy figure?
To turn 2D character art into a custom toy figure, the artwork is first reviewed for production feasibility. Then a 3D model is created, a prototype sample is made, the structure is adjusted, molds are opened, color samples are approved, and mass production begins after final confirmation.
2.Can a toy manufacturer create a figure from only one 2D image?
A manufacturer may be able to start with one 2D image, but front, side, and back views are much better for accurate 3D modeling. If only one image is available, the 3D artist may need to interpret missing details.
3.Do I need a 3D file before contacting a custom toy manufacturer?
No. Many buyers only have 2D character art at the beginning. A professional manufacturer can help create a 3D model based on the artwork. However, if you already have a 3D file, it may still need to be optimized for toy production.
4.What information should I prepare for a custom toy figure quotation?
You should prepare character artwork, target size, quantity, material preference, color references, product type, packaging idea, target market, and expected timeline. More complete information helps the manufacturer provide a more accurate quotation.
5.Why does 2D artwork need to be adjusted for toy production?
2D artwork may include details that are too thin, too sharp, too fragile, or difficult to paint. Adjustments help make the figure stable, moldable, durable, and suitable for mass production while keeping the character recognizable.
6.What material is best for a custom character figure?
PVC is commonly used for custom character figures because it supports detailed shapes, stable production, and painting. ABS, vinyl, or silicone may also be used depending on product design, size, function, and budget.
7.What is the first step to Turn 2D Character Art into a Custom Toy Figure?
The first step is to review the 2D artwork and confirm whether the design is suitable for toy production. The manufacturer should check the character’s shape, pose, accessories, balance, small details, material direction, and production feasibility before 3D modeling begins.
8.Why is 3D modeling necessary to Turn 2D Character Art into a Custom Toy Figure?
3D modeling is necessary because a 2D image is flat, while a toy figure needs real volume, structure, balance, and manufacturable parts. The 3D model helps convert the character into a production-ready figure before sampling, mold making, and mass production.
9.Why is sample approval important?
Sample approval helps confirm the physical appearance, size, pose, details, balance, and painting direction before mass production. It reduces the risk of costly mistakes after mold opening or bulk production.